IntelliJ KEYMAP #3(Mac)

3回目は、検索と置換とVCS/Local Historyリファクタリングです。ちなみにKeymapは、Mac OS Xです。

Search / Replace
ショートカットキー 説明
Shift * 2 どこでも検索
Command F ファイル内検索
Command R 置換
^ Shift F 全ファイルから文字列検索
VCS/Local History
ショートカットキー 説明
^ V バージョン管理システムメニューをポップアップ表示
Refactoring(左ペインで)
ショートカットキー 説明
F5 ファイルのコピー
F6 ファイルの移動
Command Delete セーフデリート
Shift F6 リネーム

IntelliJ KEYMAP #2(Mac)

2回目は、Usage SearchとNavigationです。ちなみにKeymapは、Mac OS Xです。

Usage Search
ショートカットキー 説明
Option F7 プロジェクト内でカーソルが当たっているクラス(メソッド)が使われている箇所を表示
Command F7 ファイル内でカーソルが当たっているクラス(メソッド)が使われている箇所を表示
Command Shift F7 ファイル内でカーソルが当たっているクラス(メソッド)が使われている箇所を強調して表示
Command Option F7 プロジェクト内でカーソルが当たっているクラス(メソッド)が使われている箇所を一覧表示
Navigation
ショートカットキー 説明
F12 アクティブウインドウをツールウインドウにする
ESC アクティブウインドウをエディタにする
Shift ESC (直近の)アクティブウインドウを隠す
Command F4 アクティブなタブを閉じる
Command E 最近開いたファイルをポップアップ表示
Command B または Command Click 変数の宣言箇所にカーソルを移動(Command Clickは変数にカーソルが当たってる時)
Command Option B または Command Click 実装箇所にカーソルを移動(Command Clickはメソッドにカーソルが当たってる時))
Command [ コードブロックのはじまりに移動
Command ] コードブロックの終わりに移動
Command F12 ファイル構成(フィールドやメソッド)をポップアップ表示
^ H タイプハイアラーキーを表示
Command Shift H メソッドハイアラーキーを表示
Option ^ H コールハイアラーキーを表示

IntelliJ KEYMAP #1(Mac)

何回かに分けてIntelliJのKEYMAPについて紹介したいと思います!
1回目は、Editingです。ちなみにKeymapは、Mac OS Xです。異なる方はちょいと変わってくると思います!

ショートカットキー 説明
^ Space ベーシックなコード補完(いくつかクラスやメソッドや変数の候補をあげる)
^ Shift Space スマートなコード補完(そのメソッドで期待されるタイプの変数の候補をあげる)
Command P パラメータ情報表示
^ J クイックドキュメント表示
Command コードをマウスオーバー 簡単なドキュメント表示
^ N GetterやSetterやConstructorなどのコードを生成
Command O オーバーライドメソッドの表示
Command Option T if...elseやtry...catchなどの雛形コード生成
Command / カーソルがある行のコメントアウト
^ Shift Q コンテキスト情報の表示。puclic class Test extends Hoge { を表示
Command Option L コードフォーマット
^ Shift O import文の整理。使ってないものの削除やソートを行う
Command D カーソルがある行を下に向かってコピペを行う
Command Enter カーソルがある箇所から改行する
Shift Enter カーソルがある行の次の行に空行を追加
Command Shift [ カーソルがある箇所のブロックの始まりからカーソルの箇所まで選択
Command Shift ] カーソルがある箇所からブロックの終わりまで選択
Option → カーソルが単語の終わりに遷移
Option ← カーソルが単語の始まりに遷移
Command W カーソルがある単語を選択

IntelliJ Idea設定項目~備忘録~

転職先のPCのIntelliJさんを自分のカスタマイズにしました。これ毎回探してるな〜って思っててこれ書いて自分の設定まとめます。
どなたかのお助けになれればと思います。

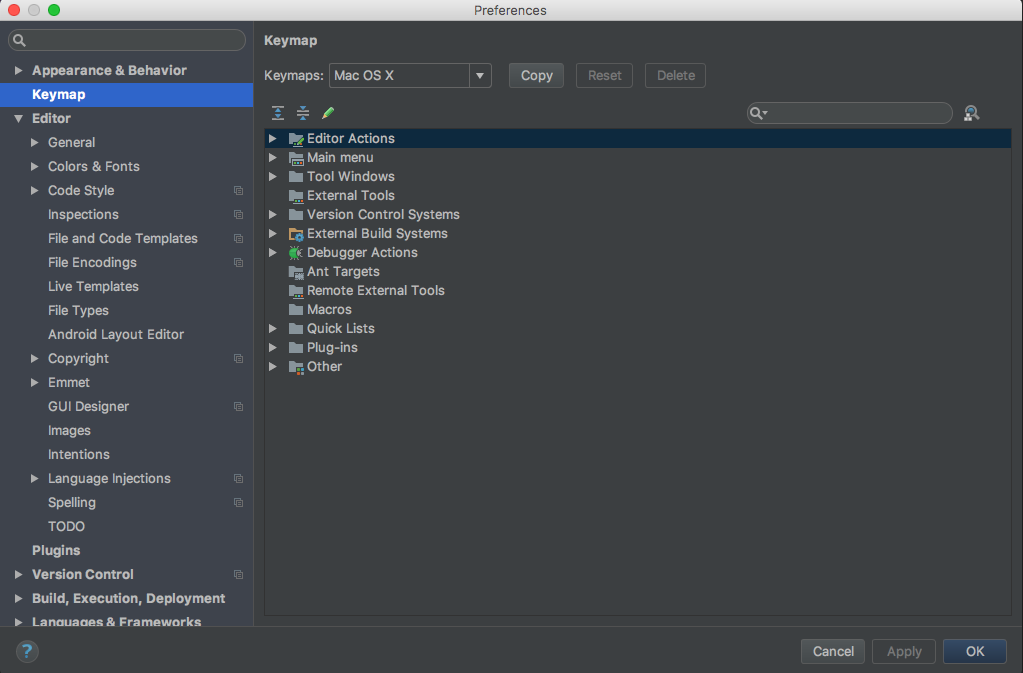
Keymap

Keymapsは、Mac OS Xにする。
f:id:b1a9id:20170408224632p:plain

Editor

General
  • Ensure line feed at file end on Save - ON:行末の不要なスペースやタブを保存時に削除する

● Auto Import

  • Add unambiguous imports on the fly - ON:勝手にimportしてくれる
  • Optimize imports on the fly - ON:不要なimportは削除してくれる

● Appearance

  • Show line number - ON:行番号の表示
  • Show method separators - ON:メソッドの区切り線
  • Show whitespaces - ON:空白の表示
  • Case sensitive completion - None:大文字小文字を区別しないで補完

● File Encodings

  • Transparent native-to-ascii conversion - ON:native2asciiの有効化
CodeStyle
  • Line separator (for new files) - Unix and OS X(\n):改行コード

Plugin

  • Lombok plugin:Lombok使うならいれなきゃだめ
  • A prevent pinned tabs from closing plugin - by momomo.com:固定したタブを閉じられなくするプラグイン
  • RegexpTester:正規表現を試せる
  • Save Actions:ファイルを保存するときにコードに対してアクションを施せるプラグイン

とりあえずこんなもんかな。

バブルソート

バブルソートは最も単純な整列法です。

バブルソートアルゴリズム

  1. 配列の末尾から先頭に向かって隣り合う要素を比較する
  2. 後ろの要素が前の要素よりも小さければ交換する
  3. 1と2を繰り返す

以下が、バブルソートJavaプログラムです。

import java.util.Arrays;

public class BubbleSort {
	public static void main(String[] args) {
		int[] array = {2, 5, 8, 6, 10, 1, 3, 7, 9, 4};

		for (int i = 0; i < array.length - 1; i++) {
			for (int j = array.length - 1; j > i; j--) {
				if (array[j - 1] > array[j]) {
					int x = array[j - 1];
					array[j - 1] = array[j];
					array[j] = x;
				}
			}
		}

		Arrays.stream(array).forEach(System.out::println);
	}
}

出力結果

1
2
3
4
5
6
7
8
9
10

参考:基礎から学ぶデータ構造とアルゴリズム 著:穴田有一・林雄二

Spring Actuatorが誰でもみれなくなっちゃったの巻

Spring Actuatorで登録されてるBeanをみようと思って、pom.xmlにSpring Actuatorを追加しました。(以下参照)
Versionはご自由にどうぞ!

<dependency>
    <groupId>org.springframework.boot</groupId>
    <artifactId>spring-boot-starter-actuator</artifactId>
    <version>1.5.1.RELEASE</version>
</dependency>

そして「http://localhost:8080/beans」にアクセース!
「401:Unauthorized」が返ってきました。あれ?と思いログ見ると次の出力が!
「Full authentication is required to access actuator endpoints. Consider adding Spring Security or set 'management.security.enabled' to false.」
仕様変わったのか!(前記事で見たような)と思いログの出力のとおりに。
まず、pom.xmlにこれを追加。

<dependency>
    <groupId>org.springframework.boot</groupId>
    <artifactId>spring-boot-starter-security</artifactId>
</dependency>

次に、application.propertiesにこれを追加。

management.security.enabled=false

再度、「http://localhost:8080/beans」にアクセース!よし見れた!
f:id:b1a9id:20170313175839p:plain

もしくは、ユーザにACTUATORを権限をつけるとみれます。

ちなみに、Spring Securityを使うとデフォルトでベーシック認証が有効になっているので無効にする場合は、application.propertiesに以下を追加してください。

security.basic.enabled=false

詳細はここに書いてあります。
48. Monitoring and management over HTTP
はじめてのVagrant

Vagrantをちょっとみました。インストール手順まとめました。

Vagrant?ってなった人は、これをお勧めします。
Vagrant導入手順から本ブログに記載します!
qiita.com

1.Vagrantをインストール

これを参考にしました。
qiita.com

brew cask install virtualbox
brew cask install vagrant
brew cask install vagrant-manager

2.VMディレクトリの作成

mkdir -p ~/vm/vm-dir/
cd ~/vm/vm-dir/

3.Vagrantfileの生成

私は、CentOS7を使います。

vagrant init --minimal  centos/7

4.VMの起動とSSHログイン

VMを起動します。

vagrant up
==> default: Checking if box 'centos/7' is up to date...
==> default: Clearing any previously set forwarded ports...
==> default: Clearing any previously set network interfaces...
==> default: Preparing network interfaces based on configuration...
    default: Adapter 1: nat
==> default: Forwarding ports...
    default: 22 (guest) => 2222 (host) (adapter 1)
==> default: Booting VM...
==> default: Waiting for machine to boot. This may take a few minutes...
    default: SSH address: 127.0.0.1:2222
    default: SSH username: vagrant
    default: SSH auth method: private key
==> default: Machine booted and ready!
==> default: Checking for guest additions in VM...
    default: No guest additions were detected on the base box for this VM! Guest
    default: additions are required for forwarded ports, shared folders, host only
    default: networking, and more. If SSH fails on this machine, please install
    default: the guest additions and repackage the box to continue.
    default:
    default: This is not an error message; everything may continue to work properly,
    default: in which case you may ignore this message.
==> default: Rsyncing folder: /Users/hoge/vm/vm-dir/ => /vagrant
==> default: Machine already provisioned. Run `vagrant provision` or use the `--provision`
==> default: flag to force provisioning. Provisioners marked to run always will still run.

起動状況の確認

vagrant status
Current machine states:

default                   running (virtualbox)

The VM is running. To stop this VM, you can run `vagrant halt` to
shut it down forcefully, or you can run `vagrant suspend` to simply
suspend the virtual machine. In either case, to restart it again,
simply run `vagrant up`.

SSHログイン

vagrant ssh
[vagrant@localhost ~]$

SSHログインできました。
ちなみに、「VMのシャットダウンは vagrant halt, 休止は vagrant suspend です。」

疑問1)boxって何?
公式ドキュメントより。boxとは、Vagrant環境のためのパッケージフォーマットと書いてあるけど。よくわからん。
www.vagrantup.com